
Introduction to Taking Screenshots on PC
Taking screenshots on a PC is an important skill that can benefit users in various situations, whether it’s for work, education, or personal tasks. Screenshots allow individuals to capture and share visual information quickly, making them a handy tool for many scenarios. Understanding how to effectively take and manage screenshots can streamline communication and enhance workflows.
Importance of Screenshots
Screenshots serve numerous crucial purposes. They enable users to capture important information that can be referred to later, whether it be an email, a message, or any on-screen content. Sharing visual information becomes effortless with screenshots, allowing individuals to quickly send images via email or messaging platforms. Additionally, capturing software issues through screenshots can facilitate easier communication with technical support, providing context that can speed up the troubleshooting process. Screenshots can also assist in documenting online transactions or confirmations, which is essential for record-keeping. Furthermore, for educators and content creators, screenshots can be instrumental in creating tutorials, guides, or additional educational materials. They also enable users to save high scores or achievements in gaming, documenting their victories as memorable moments. As digital communication continues to expand, the ability to take and share screenshots becomes increasingly vital for effective information exchange.
Types of Screenshots
Users can capture different types of screenshots depending on their needs, with various methods available for each type. For full-screen captures, the most common method is to press the Print Screen (PrtSc) key, which copies the entire screen to the clipboard, allowing users to paste it into an image editing software for saving or editing. Another useful method is the Windows key plus Print Screen combination, which directly saves the full screenshot to the “Screenshots” folder within the “Pictures” library, eliminating extra steps for users looking for quick storage. For those needing to capture only certain parts of the screen, tools like Snip & Sketch or the classic Snipping Tool offer flexibility. Utilizing shortcuts such as Windows key + Shift + S allows users to select a specific area to capture, making it easier to focus on important details. Furthermore, users can capture the active window by pressing Alt + PrtSc, which is useful when they want to avoid clutter from other open applications. With these varied techniques, users can choose the most efficient style for their specific needs, ensuring that they capture the right information effectively.
Using the Print Screen Button (PrtSc)
Locating the Print Screen Button
The Print Screen button, commonly labeled as PrtSc, is usually positioned in the upper-right corner of a keyboard, near the function keys. It may appear as a single key or be combined with other shortcuts depending on the keyboard model. Users with laptops often need to press the Fn (Function) key alongside the PrtSc key due to space constraints. Identifying this key is the first step in capturing screenshots effectively.
Capturing an Image with the Print Screen Button
To capture a screenshot of the entire screen, pressing the PrtSc key is sufficient. This action copies the image of everything displayed on the screen to the clipboard, allowing users to paste it into applications such as Microsoft Paint, Word, or PowerPoint by using the Ctrl + V keyboard shortcut. For a more immediate and hassle-free method, pressing the Windows key along with the Print Screen key enables the system to capture the screen and save it directly as a PNG file in the “Screenshots” folder located within the “Pictures” library. This approach negates the need for additional steps, making it one of the most popular methods for quickly saving a screenshot.
However, if users want to focus on a specific window rather than the whole screen, they can use the combination of Alt + PrtSc. This command captures only the active window and copies it to the clipboard, which can also be pasted into any image editing program or document with the same Ctrl + V shortcut. This targeted screenshot option is particularly useful when multiple applications or windows are open, as it helps streamline the content that needs to be shared or saved.
For anyone who frequently needs to take screenshots, these methods represent the core techniques for capturing images on a computer screen. The flexibility of the Print Screen command allows for both full-screen captures and focused snapshots, catering to various user needs and making this tool invaluable in professional and personal contexts.
Using Snipping Tool for Screenshots
Opening Snipping Tool
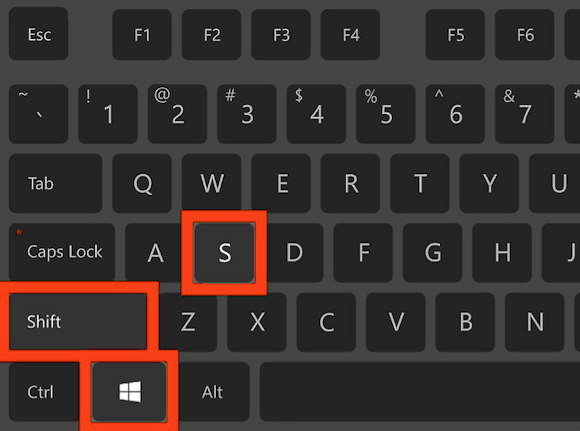
To access the Snipping Tool, users can initiate it by searching within the Start menu. Typing “Snipping Tool” in the search bar yields quick access to the application. Another option is to press the Windows key along with Shift and S simultaneously, which will launch a simplified version of the Snipping Tool directly from any screen. This is especially convenient for immediate captures. Users may notice a notification that appears once the screenshot is taken, facilitating easy access for editing and saving.
Different Ways to Capture Screenshots with Snipping Tool
The Snipping Tool offers multiple modes to cater to different capturing needs. Users can select from options such as Freeform Snip, Rectangular Snip, Window Snip, and Full-Screen Snip. Each mode serves specific purposes, allowing for flexibility in capturing images. The Freeform Snip option enables users to draw a freeform shape around an object on their screen, making it perfect for irregular captures. On the other hand, the Rectangular Snip lets users drag the cursor around a specific area to create a rectangular selection.
For individuals looking to capture only one open window, the Window Snip option simplifies the process. This mode permits users to select any application window on their screen for an immediate capture. Full-Screen Snip caters to users needing complete screen captures, including all visible content.
Using the Snipping Tool is straightforward. After selecting a snip mode, the screen dims slightly, providing a visual cue for the user to make their selection. Once the area of interest is chosen, the screenshot appears in a new window where users can edit the image using various tools. They can annotate the screenshot with notes or highlight important areas with the Pen or Highlighter features.
The tool also provides an Eraser option, allowing users to remove any annotations made. Additionally, shapes can be added, and text can be inserted into the snip for more context. Saving the image is easy; users simply click the Save As option, choose the desired location, and assign a file name. This streamlines the process, making sharing and storing screenshots efficient and effective.
In summary, the Snipping Tool equips users with versatile options for capturing a range of screenshots. Whether for professional documentation, personal use, or educational purposes, it is a valuable resource for capturing and editing screen content.
Working with Captured Screenshots
Editing Screenshots
Once a screenshot is captured, users have the ability to edit it to suit their needs. They can open the image in an editing program such as Microsoft Paint, which is commonly included in the Windows operating system. In Paint, users can crop the image to remove any unnecessary parts, annotate it by adding text or highlights, and even draw shapes or arrows to emphasize specific areas. For those requiring more advanced editing features, programs like Adobe Photoshop offer extensive tools for detailed modifications. However, for simpler tasks, Paint is often sufficient and easy to use, allowing for quick edits before sharing or saving the image. The editing features enable users to mark important information, making screenshots more informative and tailored to their purposes.
Saving and Sharing Screenshots
After editing, users can save their screenshots in various formats, primarily PNG and JPEG. Both formats serve different needs; PNG is preferred for images that require transparency, while JPEG is suitable for typical photographs where file size might be a concern. To save an edited screenshot in Paint, for instance, users can navigate to the “File” menu, select “Save As,” and choose their desired format and file location.
Sharing the captured images is straightforward and can be done through several methods. Users can attach the saved file directly to emails, upload it to social media platforms, or use file sharing services like Google Drive or Dropbox for broader distribution. Moreover, those who capture images using the Snipping Tool or Snip & Sketch can directly share the screenshot via the application interface, thus streamlining the sharing process. The flexibility in saving and sharing options allows users to choose the method that best suits their specific requirements at any given time. Since capturing, editing, saving, and sharing screenshots is integral to modern digital communication, mastering these processes can significantly enhance productivity and efficiency in both personal and professional contexts.
Understanding the Difference Between Static Image and Video Snips
Benefits of Static Image Snips
Static image snips provide significant advantages when capturing still content from a screen. Users can easily create a visual reference or documentation of important information, such as error messages, digital receipts, or key portions of presentations. By selecting specific areas of the screen, they can focus on only what’s necessary, eliminating distractions from surrounding elements. Another benefit is that static images can be easily edited and annotated. Users can highlight important aspects, add comments directly onto the screenshots, and remove extraneous information that is not relevant to the message they want to convey.
Furthermore, static image snips are easier to share and distribute. Files in formats like PNG or JPEG can be effortlessly attached to emails or uploaded to various platforms. They consume less bandwidth and storage space compared to video files, making them a more efficient choice for quick communications or collaborations. With the ability to copy and paste text directly from the captured images thanks to Optical Character Recognition (OCR), users can directly reference or quote the material without needing to type it out manually. This convenience increases the speed and efficiency of communication in both personal and professional settings.
Benefits of Video Snips
Video snips offer a distinct set of advantages, particularly when capturing dynamic content or actions on the screen. Users can record a series of movements, such as tutorial walkthroughs, gameplay strategies, or software demonstrations, providing a more comprehensive view of the information. This format is especially useful for educational purposes, where visual and auditory elements combined can enhance the learning experience. Additionally, users can showcase features in real-time, allowing viewers to see how specific tasks are accomplished on screen.
Video snips also allow for more interactive elements. After recording, users can add audio commentary or create captions to elaborate on what is being demonstrated, catering to varied audience needs. As viewers can replay the content, video snips facilitate better understanding and retention of complex information. Moreover, the ability to edit video snips in applications like Clipchamp means users can refine their recordings further, cutting out unnecessary sections, enhancing clarity, or including helpful annotations post-recording.
Ultimately, both static image and video snips serve essential functions in modern digital workflows. Each format caters to different needs, whether quick reference and communication through images or detailed instruction and demonstration via videos. Understanding their unique benefits helps users decide which method best suits their specific requirements.
Advanced Tips for Screenshots
Using Shortcuts for Quick Screenshots
Many users find it beneficial to utilize keyboard shortcuts for capturing screenshots quickly. For example, pressing the Windows key along with the Print Screen (PrtScn) key captures the entire screen and saves the image directly to the Screenshots folder. Alternatively, users looking to capture only a specific area can press Windows + Shift + S. This combination dims the screen and allows them to draw a rectangle around the desired area, which is then copied to the clipboard for easy pasting into documents or images. To capture the currently active window, the combination of Alt + PrtScn copies it directly to the clipboard. This expedites the process, eliminating the need for manual selection each time. Such shortcuts are ideal for users who frequently need to capture and share content without disrupting their workflow, enhancing productivity significantly. Adopting this method of taking screenshots can save time and streamline tasks, especially in busy environments where efficiency is essential.
Customizing Screenshot Settings
The Snipping Tool offers users the option to customize various settings, significantly enhancing the screenshot experience. Within the tool, users can specify the default snipping mode they prefer, whether it be rectangular, free-form, window, or full-screen. This flexibility allows them to tailor their screenshot process to their needs, eliminating unnecessary steps. Furthermore, users can enable a delay option if capturing menus or pop-ups that are not easily accessible at a moment’s notice. Setting a delay of a few seconds provides a buffer for users to prepare their screens before the snip is taken, allowing for smoother and more accurate captures. Additionally, some users may prefer to add the Snipping Tool icon to the taskbar for easy access. By right-clicking the Snipping Tool from the search results, they can select ‘Pin to taskbar.’ This accessibility ensures that the tool can be launched quickly, allowing users to take urgent screenshots without rummaging through menus. Users can also explore settings to disable the inclusion of URLs in HTML snips, providing a cleaner presentation when sharing screenshots. Such customizations greatly enhance the user experience, enabling them to create screenshots that meet specific project or personal requirements effortlessly. Having these advanced tips in mind makes a significant difference in how users approach taking and sharing screenshots, ensuring they maximize the potential of the tools available to them.
Common Issues and Troubleshooting
Blank Screenshots
One common issue users may encounter while taking screenshots is ending up with a blank screenshot. This problem can originate from a few sources. First, if a program is running in a mode that does not allow image captures, such as certain full-screen applications or games, screenshots may appear blank. To resolve this, users should attempt to exit full-screen mode and then capture the screen again. Additionally, certain security settings or screen recording software might interfere with the screen capture process. In such cases, checking for any active restrictions in the software settings and disabling conflicting applications before taking the screenshot may prove useful. Users might also want to ensure they have the necessary permissions for all applications involved, as restricted permissions can sometimes lead to blank captures.
Screenshot Not Saving Properly
Another frequent issue is that screenshots are not saving as expected. This can happen due to various reasons, like insufficient storage space on the device or improper settings in the screenshot capture tool. Users should first verify that there is sufficient disk space available in the designated save location, generally the “Pictures” folder under “Screenshots.” If space is limited, freeing up some storage can help resolve this issue. Additionally, if users are utilizing the Snipping Tool, it is crucial for them to manually select the save option after taking a screenshot. Forgetting this step can lead to lost images, especially if they fail to paste them somewhere. Users are encouraged to ensure they are familiar with the Snipping Tool’s save and share options to avoid such mishaps. Explaining the exact steps when taking a screenshot can help mitigate confusion and save time. Evaluating file types and ensuring the preferred format is selected during the save process can also avoid compatibility issues. For those experiencing persistent problems, resetting the Snipping Tool or seeking updates for the application may solve underlying technical difficulties, ensuring a smoother screenshot process. Emphasizing the relevance of performing these checks can significantly enhance the overall screenshot experience for users.
Conclusion and Final Tips
Importance of Regularly Taking Screenshots
Regularly taking screenshots can significantly enhance productivity and communication. For professionals, screenshots serve as a vital tool for documenting processes, issues, or achievements. By providing a visual representation, users can convey complex information more effectively than through text alone. This practice is particularly helpful in remote work scenarios, where team members may not be in the same physical location. Having a visual aid allows for clearer instructions and better collaboration. Additionally, taking periodic screenshots can help maintain an organized record of work progress, which can be beneficial for performance reviews or project analyses.
Furthermore, users engaged in customer support or technical assistance often rely on screenshots to resolve issues efficiently. By sharing a visual of the problem, users can receive more accurate guidance, ultimately leading to a quicker resolution. Therefore, cultivating a habit of taking screenshots is important, as it not only streamlines communication but also enhances understanding among all parties involved.
Additional Resources for Screenshots
Several resources are available to help users master screenshot techniques. Microsoft provides comprehensive guides on using built-in tools such as Snipping Tool and Snip & Sketch. Users can find these resources on Microsoft’s support website, which offers detailed instructions, video tutorials, and troubleshooting tips. These guides cover various operating systems, ensuring that users from Windows 10 to Windows 11 can access pertinent information.
Additionally, various third-party applications, like Snagit and Greenshot, are designed to provide advanced screenshot capabilities. These applications often include features for editing, annotating, and sharing images, which can significantly enhance the screenshot experience. Many users find that these third-party tools offer more flexibility and customization than the built-in options.
Online communities, forums, and educational platforms also provide valuable insights into best practices for taking screenshots. Websites like YouTube have abundant video tutorials showing step-by-step instructions on capturing and editing screenshots across different devices. By leveraging these resources, users can enhance their skills and make the most out of their screenshotting capabilities, improving both personal and professional projects.
In sum, utilizing screenshots effectively is an essential skill. By regularly taking screenshots and exploring available resources, users can optimize their workflow and enhance communication in various aspects of their work.


