
Introduction
Renaming your Windows computer can often slip under the radar, yet it holds a level of importance that can enhance both user experience and system organization. The default names assigned to devices by manufacturers can be generic and lack identity. A more personalized name not only makes it easy to identify the device in a network but also helps in creating a connection between the user and the device.
Importance of Renaming Your PC
A computer’s name is more than just a label. It serves as a key identifier on a network, distinguishing one device from another. This is particularly crucial in environments like homes or offices where multiple devices may be connected simultaneously. A unique name eliminates confusion, making it easier for users to recognize their device when accessing shared resources like files, printers, or other networked applications. Furthermore, a distinct name can streamline troubleshooting, as users or support staff can quickly pinpoint the device in question.
Additionally, changing the computer name can play a role in cybersecurity. Using default names can expose your system to unnecessary risks, as they are often predictable and could be targeted by malicious actors. By customizing the name, users add a layer of obscurity, making it slightly harder for outsiders to attack or compromise the device.
Benefits of Changing Your PC Name
There are several benefits to renaming a Windows PC. Firstly, personalization adds a touch of individuality to the computing experience. Whether it’s naming a laptop after a favorite character or referencing its specifications, the act of customizing encourages user engagement.
Another significant advantage is the organization that comes with a meaningful naming convention. Naming guidelines suggest including elements such as the brand or model number, which can aid in categorizing devices in environments with diverse technology. For example, naming a machine “LenovoT14Lap” for a Lenovo ThinkPad T14 provides immediate insights about the machine, which can help in maintaining inventory or managing resources efficiently.
From a practical standpoint, renaming the computer can contribute to easier networking. In networks where file sharing or remote access is common, meaningful names enable users to easily locate the correct device. Lastly, for users who regularly connect to multiple devices, having distinct names ensures that they can quickly identify and switch between devices without confusion. This level of convenience can save time and enhance productivity during daily tasks.
Steps to Change Your PC Name in Windows 10
Using Settings
Changing the name of a Windows 10 computer can be done easily through the Settings app. This method involves a few straightforward actions that will lead to a personalized computer name. Users should ensure they have administrator rights prior to making this change.
1. Navigate to Settings
To begin the process, the user should locate the Start menu button on their computer, which is typically found in the bottom-left corner of the screen. By clicking on the Start menu, they should select the gear icon that represents Settings. This will open the Windows Settings window, where various options can be adjusted. Next, the user should navigate to the “System” category, which includes settings related to display, notifications, and computing features. Within the System settings, the user must find the “About” option located in the left sidebar.
2. Click on About and Rename this PC
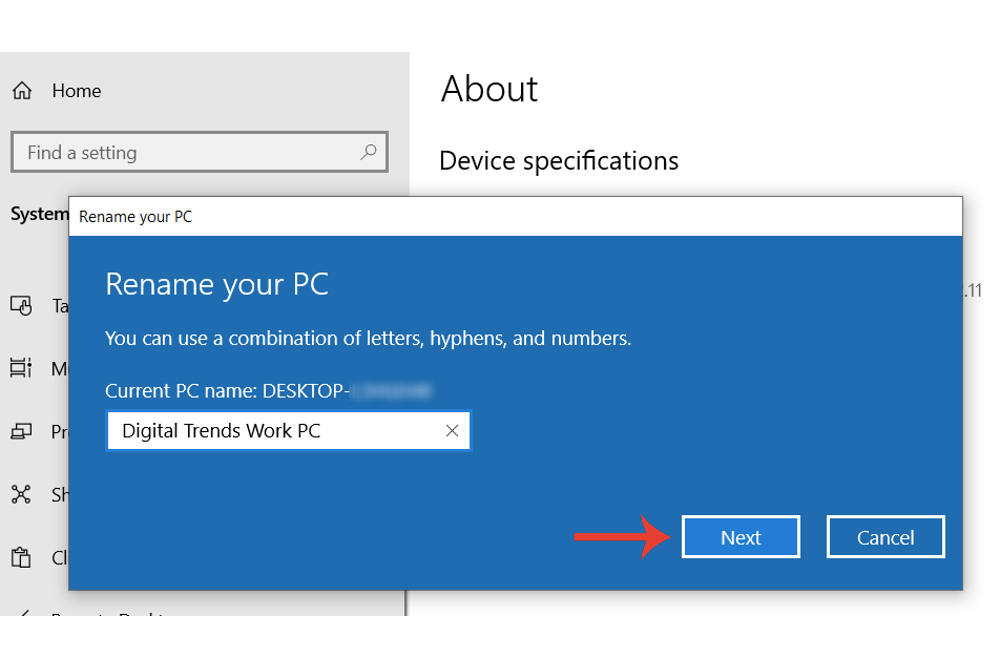
Within the About section, the user will see information about their PC, including the current computer name. To proceed with renaming the device, they need to locate the “Rename this PC” button. Upon clicking this button, a dialog box will appear, prompting the user to enter a new name for their computer. The new name must adhere to Windows naming conventions, which dictate that it should not exceed 15 characters and can only consist of letters, numbers, and hyphens; special characters or spaces are not permitted.
After entering a preferred name, users should click on the “Next” button. A notification will inform them that they must restart their computer for the changes to take effect. Users have the option to restart immediately or later. It’s advisable to save any open files and applications before proceeding with the restart to avoid losing any progress. Once the computer boots up again, the new name will be displayed, allowing for easier identification on a network or among multiple devices. This simple process enhances organization and personalization within the Windows operating system, making it a worthwhile task for users looking to customize their computing environment.
Alternative Method to Rename Your PC
Using Charms Bar
For users running Windows 8.1, another efficient way to rename the computer is through the Charms Bar. This method is particularly useful when navigating the operating system’s unique interface.
1. Launch Charms bar and click on Settings
To start the process, the user should move their mouse cursor to the upper or lower right corner of the screen. This action reveals the Charms Bar, which features various shortcuts for easy access to system functions. Once the Charms Bar is visible, the user clicks on the “Settings” icon, which looks like a gear. This operation will bring up several options related to system configurations.
2. Select Change PC settings and Rename PC
From the Settings menu, the user needs to look for the option labeled “Change PC settings” located at the bottom of the list. Clicking this option opens a new window displaying various categories for adjusting different aspects of the computer. In this new window, the user should navigate to the “PC and devices” section on the left side. Within this section, there will be an option titled “PC info,” which needs to be selected to display information related to the computer.
Once in the PC info section, the user will find a button labeled “Rename PC.” Clicking this button prompts a dialog box to appear, allowing the user to enter a desired new name for the computer. The user must keep in mind that the chosen name should follow the naming guidelines: it should be no longer than 15 characters and can only include letters, numbers, and hyphens. After entering the new name, the user clicks the “Next” button to continue the process.
A message will appear informing the user that a restart is necessary for the name change to take effect. It is advisable for the user to ensure that any open applications are saved before proceeding with the restart. Upon rebooting, the new computer name will be visible, providing a more personalized identity to the device. This straightforward yet effective approach to renaming a computer enhances user experience and improves organizational clarity within a home or office network.
Considerations Before Renaming Your PC
Impact on Network Connections
When renaming a Windows PC, it’s essential to consider how this change may affect its network connections. Computers on a network identify each other using their names, so if a PC is renamed, it may initially cause confusion for other devices on the same network. Devices that rely on the specific name for configuration might struggle to locate the renamed PC until the network refreshes. Users might experience temporary issues, such as inability to access the computer or it not appearing in the list of networked devices, until the changes propagate across the network.
It’s advisable for users to communicate any name changes, especially in shared environments or home networks. If other users or devices refer to the old name, they might encounter confusion until they become aware of the change. In managing multiple devices, a clear naming convention, especially in environments with several PCs, can enhance both functionality and user experience.
Effects on File Sharing and Permissions
Renaming a PC can also have notable effects on file sharing and permissions within a network. For instance, if the device is part of a workgroup, shares that were made using the old name may need to be reconfigured. Other devices may not be able to access shared files or folders until the shared connections are updated to reflect the new name. This can disrupt workflow, particularly in workplaces that depend on shared resources.
Furthermore, certain applications or services that rely on the computer name may experience issues post-renaming. For example, backup software, remote access software, or program licenses tied to the computer name might throw errors if the name has changed. Users need to ensure that these services are reviewed and updated accordingly to prevent disruptions.
Reviewing any existing connections, file sharing settings, and logged-in users can help mitigate potential issues following a rename. Keeping a copy of the old name can provide a reference point for troubleshooting should any complications arise after the rename. Additionally, it would be practical to check the settings of firewall rules or security configurations that may be based on the old computer name.
Managing these aspects will enable a smoother transition and ensure that users are making a thoughtful decision when renaming their PCs. Thus, users can enjoy the personalized naming without significant disruptions to their computing experience.
Troubleshooting Common Issues
Renaming Errors
Users may encounter various errors while attempting to rename their Windows PC. Understanding these potential issues can aid in resolving them efficiently.
1. Unable to Change Name
In some cases, users may find themselves unable to change their computer name. This problem can arise due to insufficient permissions, especially in a corporate or managed environment where administrative rights are restricted. If the user does not have the necessary access, they should consult with their system administrator for assistance. Another common factor is the need for a system restart. If users attempt to change their computer name without rebooting, the changes may not take effect. Thus, restarting the device after changing the name is essential to ensure that the new name is applied properly.
Moreover, anti-virus or third-party firewall software may block certain actions, preventing the name change from occurring. If this is suspected, temporarily disabling the software may help determine if it’s the root cause. Carefully managing applications that interact with system settings is vital for preventing conflicts during the rename process.
2. Name Change Not Reflecting
Another issue that users might face is when the new name does not reflect across the network or in system settings after a rename attempt. In such instances, it is essential to verify that the user completed all the necessary steps for the renaming process, including confirming the new name and ensuring a restart was conducted. If the name still does not show correctly, this might indicate a network caching issue. Devices on the network may still recognize the old name until the network refreshes and the new naming convention propagates.
To troubleshoot this, users can try reloading the network settings. This might involve disconnecting and reconnecting to the network or even restarting the router. Additionally, checking for updates or running network diagnostics from the computer can resolve lingering issues related to name propagation. Users should also review their device’s settings to ensure that there are no lingering references to the old computer name in places like shared folders or network configurations.
Overall, taking a step-by-step approach to identify and resolve renaming errors can aid in overcoming challenges associated with changing a computer’s name efficiently.
Best Practices for Renaming Your PC
Choosing a Descriptive Name
Renaming a Windows PC should involve selecting a name that accurately describes the device. This is particularly important in environments with multiple computers, such as homes or offices, where clarity is crucial. A descriptive name aids users in quickly identifying their devices on a network. The best practice is to incorporate essential details such as the manufacturer and model, along with the type of device. For example, a user can rename an HP laptop to “HPLaptop15” or a Dell desktop to “DellXPSDesktop” to reflect its brand and type. Consistently using this naming strategy not only helps in avoiding confusion but also in maintaining an organized network environment.
It is beneficial to avoid vague names that do not convey information about the device’s function or ownership, as this may lead to challenges in resource management and troubleshooting. In workplaces, for example, a standard naming convention that reflects user roles or device purposes can enhance collaboration and reduce errors when accessing shared resources.
Avoiding Special Characters
When renaming a PC, it is essential to adhere to specific character limitations. Windows systems impose restrictions, allowing only letters, numbers, and hyphens in the computer name. This means avoiding spaces, special symbols, and excessive length; ideally, the name should not exceed 15 characters to ensure compatibility across various systems and services.
Using special characters can lead to technical issues within the operating system and may cause problems when connecting to other devices on the network. For instance, some network protocols may not recognize names with spaces or special symbols, which could prevent successful communication between devices. Therefore, users should focus on creating a straightforward and easily recognizable name.
In summary, a descriptive name that reflects the device’s manufacturer and type, combined with adherence to character limitations, ensures a smooth renaming process. By following these practices, users can enhance their computing experience while maintaining a well-organized network.
FAQs About Changing PC Name in Windows 10
Can I Change My PC Name Multiple Times?
Yes, users can change their PC name multiple times without any issues. The operating system is designed to allow users the flexibility to rename their devices as needed. Whether it’s for reorganization purposes, a change in ownership, or just a desire for a different name, Windows 10 facilitates this process. Each time a user chooses to rename their computer, they must follow the same steps, which involve navigating to the Settings app, accessing the System section, and selecting the About option to initiate the renaming process. After entering a new name, a restart of the computer is needed for the changes to take effect. This means users can easily tailor their device’s name to suit their preferences or requirements whenever necessary.
Will Changing My PC Name Affect Installed Programs?
Changing the computer name in Windows 10 does not typically affect installed programs. Applications and software are designed to function independently of the computer name, meaning that renaming the device should not disrupt their operation. However, it is important for users to note that if any software relies on network resources or mapped drives that are identified by the computer name, those connections may need to be updated after the name change. For instance, networked applications that utilize the PC name for communication or file sharing may require reconfiguration to recognize the new name. Overall, the renaming process is straightforward and should generally be seamless, allowing users to maintain their productivity without significant disruption.
Factual Data: A Guide to Renaming Your Windows PC
Is your Windows computer stuck with a name you don’t particularly like? A new PC often comes with a default name assigned by the vendor. Regardless of the Windows version, users have the ability to change it to a preferred name. However, one may wonder what an appropriate name should be. This guide offers tips on naming a Windows PC and provides instructions for changing the name.
Best Practices to Follow
Before altering the computer’s name, there are several best practices to consider. For networked PCs, the name should not exceed 15 characters and must only include letters, numbers, and hyphens, avoiding other characters. A distinctive name for the device can facilitate quick identification on a network, especially in mixed environments.
Users often prefer names that contain the manufacturer’s name, model number, and device type. For example, a name like “HPPavilionDesk” for an HP Pavilion desktop or “LenovoT14Lap” for a Lenovo ThinkPad laptop makes it immediately clear which device is being referred to. This approach enhances user experience and eases the task of recognizing devices within a network.
Steps to Rename Your PC
For those using Windows 11, renaming the PC can easily be done through the Settings menu. By navigating to Settings > System > About and clicking on “Rename this PC,” users can enter their desired name and restart their computer to implement the change.
In Windows 10, the process involves similar steps. Users go to Settings > System > About and can click the “Rename this PC” option. Again, after entering the new name and confirming with a restart, the new name will take effect.
Those operating on Windows 8.1 can use the Charms bar, selecting Settings, and proceeding to “Change PC settings.” From there, within the PC and devices category, they can find the option to rename the PC in the PC info section. Windows 7 users can rename their device by accessing the Control Panel, selecting System, and clicking on “Change settings.” In the System Properties window, they can type in the new name and restart the device.
It is noteworthy that Windows 8.1 and 7 are considered outdated as of January 2023, and users are encouraged to upgrade to a more recent version for enhanced features and support.
Summary of Benefits
Changing the name of a Windows PC can lead to various benefits. A clear and identifiable name can markedly reduce confusion when managing multiple devices, especially in busy environments like homes or offices. Users will find that a well-named computer not only facilitates efficient resource sharing but also enhances the overall user experience within a network.
The ability to personalize a computer name fosters a sense of ownership and can even contribute to improved productivity, as individuals can quickly recognize and access their devices without delays or misunderstandings.
Final Thoughts on Renaming Your PC
Ultimately, renaming a Windows PC is a straightforward process that allows users to personalize their devices according to their preferences. By following the outlined guidelines and steps, users can acquire a more organized and efficient computing environment. This adjustment not only simplifies device recognition on networks but also enhances individual user interactions with their technology, underscoring the importance of a well-chosen name.


